Tuesday, June 19, 2012

Two-fer Tuesday

Just a quick picture update to keep you up to speed on the progress. We’re really humming along, and it’s looking better and better all the time!
Test-fitting pieces of the range hood.

Now we're getting somewhere...

Dad finished it up this morning! Ready for paint! :)
The living room before..

..and after paint!


I imagine it will look better when I'm not using painters canvas for curtains, but you get the idea :)

Monday, June 18, 2012

This weekend

This weekend saw lots of changes around the house – most noticeably, paint!
As I mentioned in my previous post, my friend Anna came down for a couple days last week to start the painting project. She was excited for it and I was not..so it was a good match.
I have no idea why, but for the last several months I've just felt like part of the dining room needed to be blue.
The other two walls are the tan color from the living room and kitchen.
Moody blue..
Well, once she started, I got the fever and have been picking at it ever since. I stopped to attend the Iowa Craft Beer Festival Saturday afternoon in Des Moines (work-related…I promise) and to putter around in the yard a bit on Sunday.
My painter: I know how to pay my debts..
Painting around the kitchen.
My bedroom door. Even with this lighter color, the trim paint really pops!
Living room: painted, sans TV.
The other big change is that I’m flying solo again. No more roommate, no more cat..no more rent money. It’s really for the best – this was always meant to be a temporary thing, and it was. Roommate found a place of her own, and I get my house back. Free of cat hair and other people’s laundry. J
The other (random) project I created for myself was sort of…just more work? I moved the large pile of foundation stone out of the side yard and into the driveway. This way, I’ll be able to see what I’ve got when I’m using it to edge around the landscaping. I’ll also be able to kill off the weeds in that area and start fresh with new grass once I’ve got everything the way I want it. It will also be nice to have that out of the way when we start up the siding project in the front of the house.
I still have that little bit of siding to replace on this side..and, of course, the lawn is overgrown and weedy here now, so it will be easier to deal with all of that with these stones moved. Did I mention these stones before? They came from the foundation of the house next door. $30!!
You have no idea what this did for my OCD. Soo goood.
Speaking of which, I’m getting ready to refinance my construction note so that I can actually AFFORD to start the siding project in the front of the house. When I bought the house, my banker and I decided that it would actually be better for me to go the way of the construction note – this way, I didn’t have to put money down (my sweat equity and the improvements made counted as a down payment) and it afforded me a lot more flexibility. I pay a higher interest rate for it, and it expired after a year (had to get a small extension to finish up the kitchen), but now I’ll be able to refinance (at 2.86%, thankyouverymuch), get a little more money for this last big push, and then – one day – just come home and ENJOY being here rather than feel like I have to work at it all the time! J
If you've never had fresh broccoli...
OOH, I’ve also got broccoli popping in the garden! Several green tomatoes on the vine, lots of carrots, a few herbs..peppers..a cucumber..Brussels sprouts, and a lot of weeds. Pretty exciting stuff!

Wednesday, June 13, 2012

It's a kitchen! And color! Whoa!

So, “beeswax polish night” turned into “beeswax polish week.” It turns out, the beeswax I used made the counters look like someone had peed all over them..just kind of generally yellow with bright yellow spots where the grout holes are.
I will say this, the countertop was super smooth and shiny after the beeswax. It just had that...urine..tint to it I wasn't crazy about :)
Not what you’re 'going for' in a kitchen.
I’m still confused by that because everything I’ve read has said beeswax is the way to go – all natural, food-safe, blah blah blah. So, I don’t know if I got the wrong kind of beeswax, or if there’s more than one type? Again, because nothing out there is really specifically marketed to concrete countertops, no one at any hardware store knows ANYTHING about making them or what to sell you to finish them.
My giant beeswax. I chopped it up and melted it down so I could remove any impurities, many of those were just stuck on the outside, though. I wonder if there's a lighter colored beeswax that wouldn't yellow? I should have known this one would - being yellow to begin with and all.. 
Oh well. A little wax remover and a couple days of random, half-hearted sanding here and there and it all worked out.
We set the tops in place a few days ago and I’ll seal them in the near future. Not as convenient this way, but the show must go on.

Speaking of the show going on: I’ve got cupboard doors and drawer fronts! I’ve even got knobs and pulls! And a sink! And a dishwasher! Holy freaking moly!
Giving everything a test fit. Of course, it had nothing to do with my need to take pictures of everything..
Coming together!
A place for everything! Now I'll just finish painting the cabinets and we'll really be in business!
I called my favorite local plumber – the crew that installed my new furnace/AC/water heater – and he had all of the above knocked out in a couple hours. He also installed a new outside spigot for my hose, and hooked up the garbage disposal. For the first time ever, I was really happy to be doing dishes J

The maiden voyage. I was making sure the dishwasher wouldn't explode and figured I'd get the hang of my giant faucet in the meantime. Big fan of this sink!
 I’ve also picked out some paint – I’m just in the process of deciding where it will go. My friend Anna is coming over this afternoon to paint. She volunteered, I accepted. Things are going to start looking a lot different very soon! :D
The brown in the upper left will go in the living room, the blue in the dining room, and I haven't totally decided on the other colors. Suggestions?

Monday, June 4, 2012

Picture Update: Concrete Countertops!!

Productive weekend around here! Well, again, not crazy productive..but I feel accomplished J
I spent a few hours grinding on the countertops, as promised in my last post. Once you get used to the grinder, it’s a really easy process.
Grinder/sander/buffer loaded with a coarse-grit sanding disk.
As mentioned, I used a premixed grout to fill the holes in my tops. Once that layer was ground off using the 60-80 grit disks, I was able to go finer and finer. After a certain point you’re actually polishing rather than grinding. I finished after 800 and 1,500 grits and cleaned the tops of all the stone dust that had accumulated. A good wipe down with clean water and you’ll really get a chance to see what you’ve got.
Unless you've got a fancy-pants wet grinder, you'll need something to wet the surface. People have used ketchup bottles, gallon jugs with tiny holes punched in the bottom, or - like me - a sprayer and a watering can.
Top of this frame shows the area that hasn't yet been sanded. The bottom shows how the concrete looked after grinding the top layer of excess grout.
After one round of sanding on the coarsest grit.
A diamond grinding pad - by 3M. This is used to smooth out any rough spots the coarse grinding pads may have caused and help give the tops a shinier surface. 
I let the cleaned tops dry overnight and started wiping on my sealer the next day. I thought a lot about the sealer because of the location of the countertops. They’ve got to be resistant to moisture, staining, and all that..but they also need to be food safe because they’re in the kitchen. A lot of people online have said you can use a standard concrete sealer, but I still wasn’t sure.
Rather than risk it, I went back up to the Tile Shop where I picked out the stone for my floors. They had a food safe, water-based countertop sealer, but its instructions didn’t say anything specifically about concrete. Marble, granite, slate, quartz..all good. Concrete… maybe?
The sealer of choice. Penetrating sealer will give me the look I'm going for - a topical sealer or epoxy would make the concrete look kind of plastic and defeat the purpose of going to all this work!
Because I had read that there’s really not a sealer out there marketed especially for concrete countertops, I figured every manufacturer would omit the one thing I was looking for. That said, if this sealer would work with porous marble, it’s got to work with concrete. Right?
Anyway, I bought a couple quarts of it and went about my business. I ended up putting five coats on – it looks so good! J
Very dark when wet.
After a few coats - still wet.
Getting to be pretty dry. The penetrating sealer should leave it looking pretty natural while giving it more resistance to staining and things like that.
Tonight is beeswax polish night. I wanted to give the sealer a chance to fully cure as recommended in the instructions and those 24 hours expire after work this evening. I bought a (giant) chunk of pure beeswax from my friend Melissa from Wee Bee Apiary & Farm (http://www.weebeeapiary.com/) – I’ll melt that down and buff like crazy. After that, we can install them.
With help.
These babies are heavy!

Friday, June 1, 2012

Kitchen Update

It has been a looong time since I last posted, and we’ve gotten quite a bit done!
OK, so not “quite a bit” in the huge, noticeable sense, but quite a bit has been checked off my mental stress list. We’ve made cabinet doors and drawers (for those of you who haven’t done it before…good), poured the concrete countertops (MUCH easier than anticipated), and bought a bunch of stuff that will help tie up loose ends around the house.
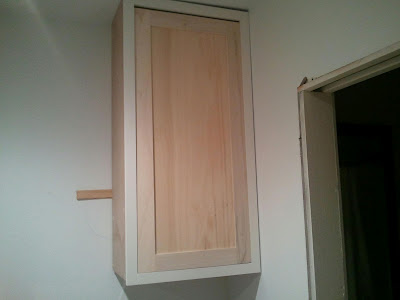
Upper cabinet with a door (not yet attached..or painted)
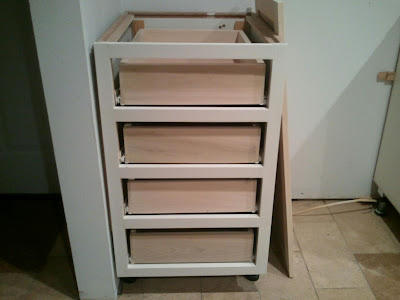
Drawers. That's all I have to say about that.
Cabinet doors and drawers have been the bane of my existence lately. I have to give my dad credit as he’s done 99% of the work on them, and for good reason: I made a set of three drawers one night after work thinking I’d surprise him by saving everyone time and effort – I’d just have the drawers done and ready to install.. No big deal.

Wrong.
Not only wrong, but WAY wrong. I’m not totally sure what I was doing: maybe I was asleep at the table saw; maybe I had been drinking heavily and forgotten about it; maybe I was abducted and just blacked out the entire experience while some ass-bag built my drawers..but those drawers came out terribly.
Back to the drawing board – with dad at the table saw – and the drawers came out great. From my newfound experience: the drawers roll easier when they are square/the same size/well constructed/not made by me.
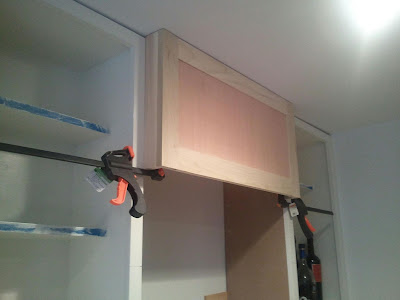
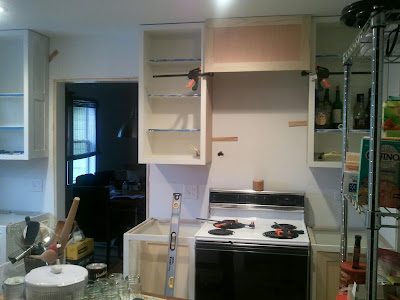
The beginning of the vent hood that goes over the stovetop.
Wicked cool.
Concrete countertops, on the other hand, are so cool! And much easier than I had them made out to be in my mind. As I’ve said before, my boss – the one who helped me out with the tile – had made a large vanity top before. He bought the book, had most all of the supplies, and had ‘been there-done that’ and could give me a heads-up about what to look for and how to insure success.
The first step is making a template. I bought a roll of lath at the hardware store, though you could use cardboard strips, old soda boxes, strips of old paneling you have no use for… yada, yada. Using my lath, I glued and stapled around the edges of the tops of the cabinets leaving roughly a ¾” overhang over the front of the cabinet. You use the lath not only to get the most accurate rough shape, but to really tailor the countertop to the curves and little imperfections in the walls – really important in any house, but especially one that’s 100+ years old.  
The next major step is building the form. I used ¾” thick melamine for the base, and I was able to build all my forms on that one sheet. The benefit of limited counter space.
From there, I used leftover half inch thick melamine strips to form the “walls” of the forms which are built around your templates. Make sure to flip your template upside down onto the thick melamine base – the bottom of the form will actually be the top of your countertop. (Because I had initially planned to build the forms individually, I made the side strips taller than they should have been in order to screed. I could have gone back and cut them all again, but it wasn’t a huge deal either way.)
Forms built with pencil rod all cut, tied, and ready to go.
Once everything has been screwed into place, run a bead of silicone caulk around all the corners of the form. This will keep water and concrete from seeping out the edges of the forms, and will save you some grinding time down the road as it eases all the edges for you!
The book I read (http://www.amazon.com/Concrete-Countertops-Design-Finishes-Kitchen/dp/1561584843) advocates mixing your concrete from scratch – sand, Portland cement, aggregate, enhancers, additives, etc. A lot of the fancier additives wouldn’t have been available locally, and I read QuickCrete works just as well. Done.
You can add all kinds of things to the mix: river rock, colored glass, decorative metal, seashells..anything really. I also liked the idea of building a drain board right into the counter, but decided against it for my first project and because I’ve really got to maximize the functionality of the space.
Anyway, mix up your QuickCrete – don’t go overboard on the water as it weakens the structure and contributes to some funky, hazy coloring on the surface. You can grind it/buff it out later, but why sign yourself up for more work?
Because my tops are only 1 ½” thick, I used a ¼” pencil rod for added structure – if you go thicker with your tops, you can use rebar, but that would have contributed a good amount of weight. A lot of people will have issues with rebar showing through or “shadowing” the surface of the countertop as well, so best to avoid it if you can.. unless you don’t mind that look.
Smooth everything out and vibrate the mix as best you can. An orbital sander (without the sandpaper) rubbed up against the sides worked well. I also used the sander to vibrate a screwdriver which I stuck down into the concrete. You won’t vibrate the mix too much, so get after it while you can. 
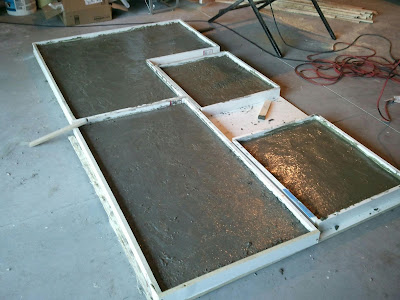
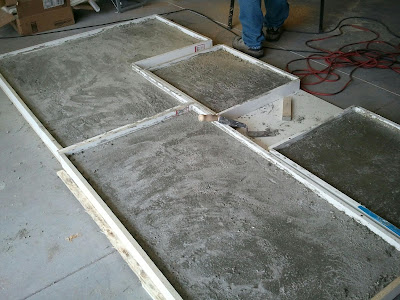
Poured. Vibrated. Smooth. Step away from the concrete.
The next day. Already probably hard enough to walk on...dont do it.
Screed everything even and let it setup. You can pop the molds off after 24 hours, or you can leave it molded for the 10 days it takes to cure – there’s really not a wrong way to do it. Keep in mind, it’s easier to grind (if you have a really rough spot) while the concrete isn’t totally dry.
Close-up of my little air bubbles. I filled mine with grout and will grind off the excess tonight.
When you’ve worked up the courage, flip these babies over and check ‘em out. I was really happy with how smooth they turned out! Mine have lots of little holes throughout the surface – the book says it could be due to improper water content or not enough vibration, but that’s what slurry is for! A little leftover QuickCrete (rocks sifted out), some Portland cement, or even – in my case – premixed gray grout will fill the holes and you can grind off the excess later. 
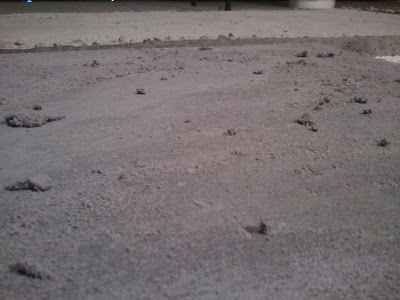
Holes filled. I scraped off the heavy stuff and will grind, buff, and seal the tops from here.

We’ll be grinding tonight. Use a diamond grinding pad (60 grit for grinding, 200, 400, 800, and 1500 grit in sequence for smoothing and polishing. 3M makes good ones.) and some water to get the job done properly. Squeegee regularly to see what you’re doing and to keep the slabs clean. After they have dried, a couple coats of a penetrating, water-based (and food-safe) sealer, a buff coat with some beeswax, and we’ll be good to go! Custom solid-surface countertops for…$80? Not a bad deal J