Wednesday, August 31, 2011

Garage Roof Update

Just a quick note to show our progress from last night - sheathing on the garage!


Notice the East gable end toward the left, here. The pitch of the dormers should match the pitch of that peak.

As I said last time, the roofers should be here (and gone) before the end of the week. We'll actually be shingling the garage ourselves since the dormers won't be in place before the roofing crew gets here to do it.

We're going to mock up different shapes and sizes for the dormers - the idea at this point is to match the pitch of the dormer with the pitch of the East gable end seen in the picture above. The hope is that the addition will look more cohesive that way instead of 'tacked on.'

Fun, fun! Come back often - lots of updating to see!

Tuesday, August 30, 2011

Cats on a Hot, Steep Roof

It’s been a busy couple of days!
Late last week we started the process of removing the layers of old shingles from the back side of the highest ridge. From the beginning, the plan has been to reconfigure the pitch of the roof to make it not only more attractive, but more viable in the long-term. Parts of the roof back there had rotted over time as water seeped where it should not have - this should help with that!
So, with the help of friends and family, we started tearing into the house. Gray, light-gray, darker gray, green, and Cedar shake waited there to be pried off, thrown down, and hauled away. Once the steeply pitched sheathing had been removed, we concentrated on the flat/shed roof segments over the bathroom and the kitchen. Remember, the kitchen and bath were added on after the original construction of the house and several years apart from one another, so those sections were at different heights and used slightly different materials in their construction. Either way, we tore into them J
Layers of Shingles: REMOVED!

Busy place..

While on the roof, we decided that only the bathroom roof would actually need to be completely removed to make way for the new trusses. After working in the sun ripping, tearing, lifting and prying, I don’t blame the guys at all for making the decision to leave the kitchen roof in place.
Looking up through my bathroom "skylight"


Half tempted to leave the bedroom like this..
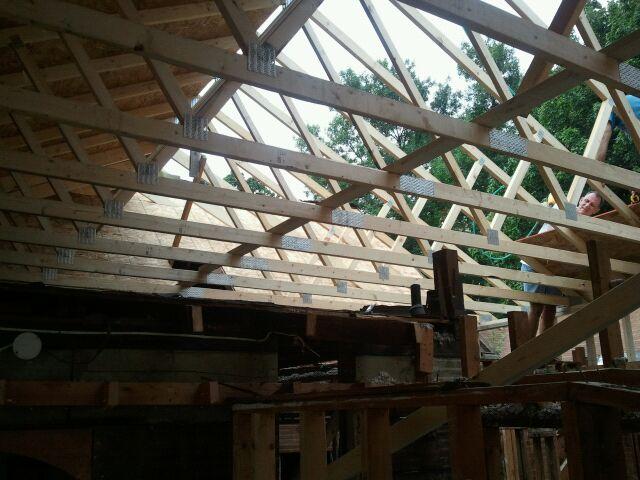
With the work nearly done removing the existing roof, our master carpenter (I refer to him as a “Goddamn Genius” at least twice a day) set out building up the walls that would support the new roof. With those sections level and square, we were free to drag the new trusses into place! Once this part started, things actually progressed really quickly.
Building the short walls for the new trusses.
Walls in place.
We carried the trusses from their spot in the front yard all the way around back to the north wall of the garage. They rested there until needed. We then lifted them up to the Genius who drug them along the top of the garage walls, onto the new house walls, and nailed them into place with help from Dad and another friend. Like I said in an earlier post: this is how we know we have great friends!


The overhang is technically called the rake, and it matches the depth of the original house.
Everything was moving along nicely until people started talking about the weather. Pesky weather. The driveway side of the roof was completely covered in plywood and partially covered with tar paper. The west side of the house, however, was only a third of the way covered with plywood…and that’s when the rain came.
We ran around grabbing tarps, hammers and nails and secured the tarps as best we could to keep the inside as dry as possible – though, I’m not sure you could hurt anything in there at this point.

Bedroom view from the laundry.


We decided to call it quits and reconvene the next day.
…And that’s when the rain stopped. Out of nowhere, a storm the size of West Virginia disappeared. Of course, we took what time we had to nap and recharge our batteries a little. My mom – the Goalsetter, as we’re calling her – rallied the troops and we were able to finish sheathing and tar papering the remainder of the roof and closing the holes we made when building the wall.
Good progress, right?! There's more!
Last night we met up after work and set the garage trusses in place, too. The consensus is: my house now looks gigantic.

Dormers still to come!
We’ll have more work ahead of us in the coming days. The roofers are coming soon, and we’ll be building a pair of dormers on the driveway side of the garage. Things really are shaping up!
It’s raining again today – check back in a few, and I’ll have more details!

Thursday, August 25, 2011

New (Old) Development!

So, remember how I wrote about not having “before” pictures in an earlier post? Well, that’s true. I didn’t…but the appraiser did. Stuffed into all of my loan information were a few pictures snapped by the woman who did a walk-through on the bank’s behalf. She also included a rough floor plan, which is helpful when you’re not familiar with the place but trying to piece my pictures together. I’ve included little signals so you can see exactly where the pictures were taken from so you can gain a little more insight.
From a design standpoint, the floor plan will stay almost exactly the same. We have moved a door here or there (not to mention added a garage), but the square footage of the living space remains.
1. Entry - new wiring, insulation, and drywall completed.
2. Living room - new electrical/audio wiring, insulation, and drywall completed.
3. Dining room - removed the partial chimney and corner hutch in addition to wiring, insulation, and drywall. 
4. Bedroom/Office - new wiring, insulation, and drywall in addition to the reconfigured closet layout and bookshelf addition.
5. Bathroom - removed paneling and massive amounts of unexplainable concrete, updated plumbing/electrical, and replaced the subfloor and wallboard. 
6. Bathroom - Pt. 2
7. Kitchen (facing Dining Room) - currently demo-ed. Planning for new cabinets and countertops.
8. Kitchen - Pt. 2
9. Laundry - a new door to the garage will take the place of the windows seen here.
10. Master Bedroom - moving the door and closet to improve the room's function. More to come!

Wednesday, August 24, 2011

Off to the Races!

The title of this post means a couple of different things for me this month. First – and most importantly for the purpose of this blog – is that the electric company came and trenched the backyard! This means there is power connected to the new meter on the new garage – yahoo!
The downside was: there was a miscommunication somewhere along the line and the overhead line was not removed from the house. (Not to be overly critical, but when you tell someone you need the overhead line removed so you can put a new roof on the house, where is the miscommunication?)
Oh well, they came back and completed their work and now we’re off to the races on the new roof!

Part Two of ‘Off to the Races’ has to do with the fact that our little town happens to be the Sprint Car Capital of the World. In short this means that once a year, drivers and fans from all over the world converge on our town of 8,000 residents. For ten days at the end of each summer, we play host to nearly 70,000 people – many from Canada, Australia, and every state in the US. It’s a lot of fun!

I’m not one to brag about (or even pay attention to) racing in most cases, but our particular brand is really exciting! Unlike some others (NASCAR, Indy, etc.) sprint car races are short, and to the point. You can spend an evening at the track and literally see ten or more events with the overall winner determined at the end of the last race.
It’s also kind of fun because you know that the sprint car racers of today will be the big shot, famous drivers of the future – Tony Stewart comes to town fairly regularly, as does Kasey Kahne and many others. There is also a racing video game with the Knoxville Raceway as the final level. Pretty cool, eh?

Anyway, enough bragging for one day. Now that the overhead line is out of the way, it’s nose back to the grindstone for this guy. Weather permitting, we’ll be back to the house the remainder of this week with (fingers crossed) a roof in place by Sunday evening.
Cheers!

Playing Catch Up

Hello again!
In the time I’ve taken between updates, we’ve hit a stall in our progress. At the moment, we’re waiting on a coordinated effort among the cement contractor, the electrician, and the electric company. Getting everyone’s schedule to align (even without including my own schedule) is proving to be a slight challenge.

What we need is this: the current electrical meter is attached to the side of the house right outside my side entrance – when we built the garage addition, we thought it would be awfully nice to move the meter to the alley side of the addition and bury the line through the backyard so it’s both out of sight and out of the way. This is a matter of aesthetic preference and practicality – we need the overhead lines out of the way if we’re going to re-roof the back of the house, let alone reconfigure the pitch of the roof.
Once we have our trench dug (32” deep – which seems excessive to everyone but the City code), we can bury the connection from the existing breaker box in the basement to the new breaker box/meter in the garage. The new breaker will connect directly to the incoming power source and will run the circuits on the back half of the house. Running the circuits in the back of the house from the breaker box in the garage will save a small amount of wire/money, but will save more with regard to time and energy involved in installation.
At any point during this process, the electric company is supposed to be coming to remove the power from the house, trench through the alley and backyard and reconnect the power to the new meter box at garage’s new meter socket. (I learned that a meter socket is a fancy word for high priced metal box. It’s the housing for the dial that records how much power you’re consuming.) In speaking with the territory manager, I found that the power company we have locally will provide 25’ of trench and 25’ of cable free of charge. Anything past 25’ is charged to me as the homeowner, but the charge is pretty minimal when you consider I won’t have an overhead wire getting in the way of the goings-on at the jobsite.
Once the power shenanigans have been resolved, we can get to work on the roof.
I’m in the process of finding a new roofing contractor. The one I had contacted and verbally committed to has more or less flaked on me…which is unfortunate because I received a great bid from him. So meeting contractors starts again. It’s not my favorite part – they’re pretty quick to tell me I should’ve just built a new house. It’s unprofessional to stick out your tongue at someone, otherwise I might.
At any rate, we got a pretty good deal on the materials for the roofing project. Trusses conveniently went on sale and there was an 11% rebate on most other building materials – including sheathing, shingles, building wrap and all the other odds and ends we will need. So, in an effort to save money and a little time down the road, we bought most of what we’ll need in the near future and then some. I likened spending all that money to ripping off a Band-Aid…do it quickly and it won’t hurt as much..


Tuesday, August 2, 2011

This just in: ONIONS

Earlier this spring, I stopped by a little greenhouse not far from home and picked up a few bunches of onion sets. I’m pretty sure you could grow them from seed if you had A) any time, B) any space, or C) the equipment..benches, grow lights, etc. Since I don’t have any of those things, I buy sets.
These sets are tiny little onions waiting to be unleashed. By the time you buy them at the nursery, they can be anywhere up to the diameter of a pencil. Once the soil is warm enough, plant your mini-pencil-onions about 6 inches apart from one another and cover with dirt. We’ve learned that the spacing really is important, and for a very simple reason: if your onions are planted too close together they won’t grow to be very large. Which is fine – that way you can use an entire onion all at once rather than have half of a giganto onion floating around in the fridge.
Anyway, our old neighbor (the one I wrote about a while back) always said that your onions should never see the August sun – otherwise they start to get hot. Which means – in light of all the work we’ve been doing on the house – July 31st was harvest day!
We had white, red, yellow, Texas sweets, and a variety called candy. Because I am a master gardener, I completely neglected to label the different varieties. Red and white I’ve got; otherwise, as far as I’m concerned, there are three different sizes of yellow onions. J
Because we planted so many, we had so many to give away. My grandparents got a batch; my bosses took several; the couple helping with my house got a bag full.. And we’ve still got onions. Lots, actually. Which is awesome because they’ll keep in the basement through the winter. Leave them dirty in a cool, dark place and they’ll keep as long as we need them to – usually they’re gone before any have the chance to spoil.
Happy Tuesday!