Wednesday, September 28, 2011

I fall down enough without help.

A few weeks ago, when we were really getting into building walls and prepping everything for electrical and plumbing work, we decided to level up the floor in my bedroom.
The floor in the bedroom itself was not out of level, but there was a pretty good drop off between the kitchen and the bedroom and the floor in the original closet sloped quite a bit.
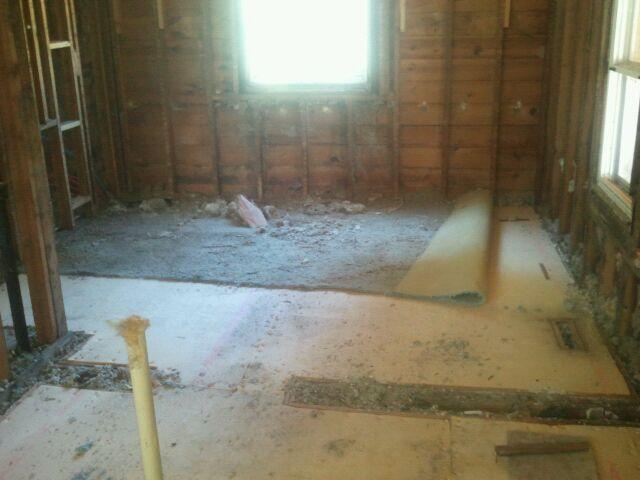
The drop off between bedroom and kitchen. This is where I fall on my face.
As we tore out the old walls and removed the old ceiling, we found the area that was used as a closet was originally part of the laundry room, which, again, was originally a porch. In an effort to help the porch floor shed water it was sloped toward the backyard. When the porch was later enclosed and that space annexed for the master closet, the floor was left as is.
All of this wouldn’t have been a problem, had we not moved the closet.
We moved the closet for a few reasons. First, and most importantly: the door to the bedroom was small in height and width. We wouldn’t be able to do anything about the width because of the adjacent pocket door to the bathroom and a sewer vent pipe running up through the wall on the other side of the bedroom door opening.
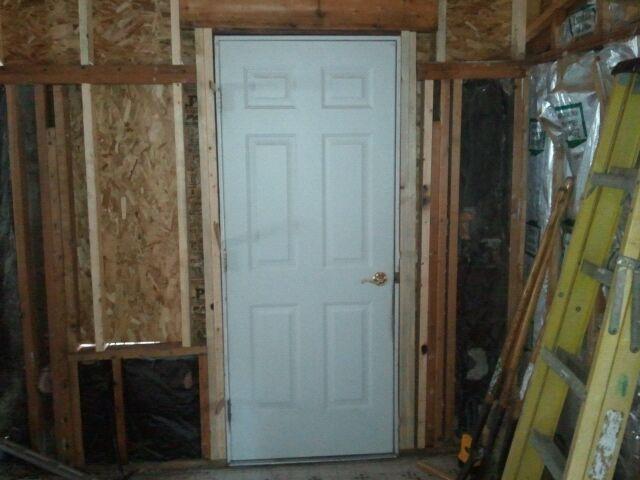
Small bedroom door to the left. New opening is just to the right of the old opening.
Because of these challenges, we elected to move the door to the “fridge wall” in the kitchen – this will afford me a larger door while allowing the vent to remain in place, but you would then enter into what used to be the closet. So, we moved the closet over to where the bedroom door was originally and provided an additional buffer between the bathroom and the bedroom. Now, I won’t hear guests singing in the shower while I’m trying to sleep AND I’ll be able to move furniture in and out of my bedroom (without tripping!) much easier than before.
Leveling the floor:
We could only do this in good conscience because the floor was in solid shape. If there were settling or rot issues, the right thing to do would have been to remove the floor entirely and deal with those issues appropriately.
Notice how thick the strip is here..
..and here. In roughly 8', the floor dropped almost two inches in the old closet.
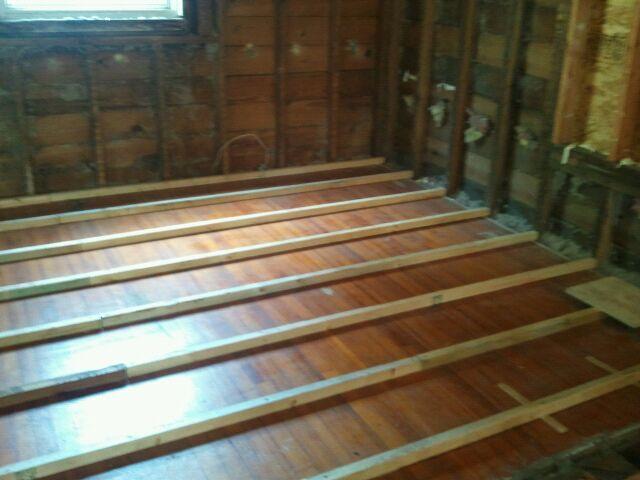
Using a level, find the highest and lowest points in the room. Starting from the high point, establish a level point using shims, furring strips, or two-by-fours depending on how out of level you are. As you progress across the floor toward your low point, the strips will get thicker, so take that into account when establishing your high point/first row. Secure those pieces to the floor using construction adhesive and screws to minimize future squeaking. From there, it’s as simple as ensuring that each strip is level in its own right, but also level with the surrounding strips.
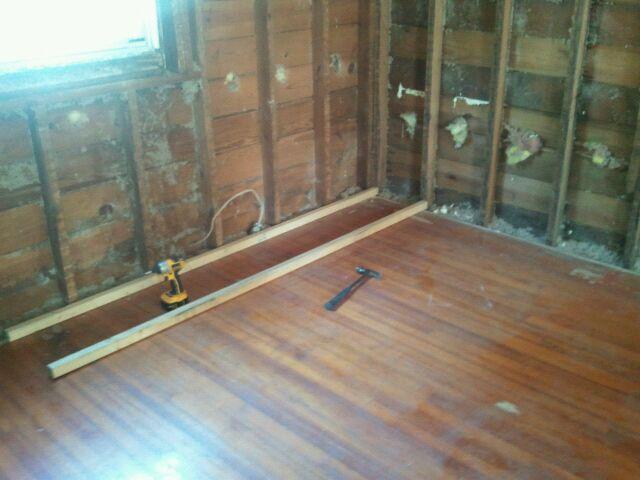
I feel bad about covering these floors..

It probably sounds complicated because I’m horrible at explaining things like this without talking with my hands. I promise, it’s simple. Once you’ve got your mind wrapped around it, it goes pretty quickly.
From there, we used ¾” tongue and groove plywood to provide more rigidity to the floor while also helping bring the bedroom floor into level with the kitchen floor at the new threshold we had created. The plywood was glued and screwed into the strips – again for rigidity and to eliminate future squeaking.
Vent pipe (center) with the new doorway to the right.
Good to go!
Once this is done, lay your level down, watch the bubble, and drink a beer to celebrate your accomplishment! Once your beer is finished, you’re ready for dancing on your new floor J

Monday, September 26, 2011

This weekend

This weekend proved to be fairly productive..when you consider we only worked for a few hours one afternoon.
As I said in the last post, we’re hung up waiting on my electrical contractor at the moment. Until he comes back, we can’t have our City inspection which means we can’t insulate..or drywall, or sand the floors, or lay the tile, or bring in the bathroom fixtures..you get the idea. Though – as you can see – once we get that inspection out of the way, we’re really going to make noticeable progress. Like..start FINISHING stuff J
For now, though, we’re working on the outside. This weekend, we worked on wrapping the garage. This should keep the weather out, and further help with energy costs down the road. And because we used plastic cap nails, it should stay put longer than if we had just used staples – this is handy because it might be a while before we can really get moving on the siding.
As you can see, we tore off more siding under the new roofline outside the kitchen. We did this so we’ll have a solid spot to attach the F-channel to. F-channel – which receives the soffit – fastens to the wall in a straight line even with the bottom edge of the fascia board. From there, you can cut your soffit (vented in this case) to fit the gap between the F-channel and the fascia board. And because we’re not really all that professional, that’s as far as we got. The next step, in theory, is to snap the new fascia in place under the existing drip edge while overlapping the edge of the soffit underneath. Whew.

When I say “in theory” with regard to the next step, it’s because there’s a small complication. You see, when we ripped the steel siding off the side of the house, we found another issue: because the house had been added onto over time, the walls don’t line up exactly from one addition to another. When you’re working with steel, it’s not as big a deal because the material is more forgiving; however, now that I’ve (finally) decided on the cement board, we’ll have to do a little more preparation before we can start hanging. The cement board material isn’t as forgiving because it needs to be secured directly to the wall every few inches. Steel siding – or aluminum or vinyl – actually kind of floats in a channel.. that, and the physical makeup of the material make it easier to hide imperfections in the walls. There might be an easy fix for this – I’ll keep you posted.


See the difference in (old) siding colors around the windows?

Once we have our exterior walls squared away, we’ll be able to hang the rest of the new soffit and finish closing off the house to the outdoors. Once our electrical inspection gets a passing grade, we’ll be able to close the inside walls and it will start to look – and feel – like a home rather than an elaborate outbuilding.
Electrician: Tuesday. Celebration: Tuesday night? Too soon to call!

Thursday, September 22, 2011

Burnout..

I don’t know if it’s waiting on my electrical contractor, haggling with my roofer, or arguing with my “roommates,” but I’m getting burnt out..
As for updates: As you could see in the last post, the garage is enclosed and being used pretty extensively. The dormers I wrote about didn’t pan out for a number of reasons, the most important being that I can’t stand it when some aspect of a house stands out in a bad way. You know that house you drive by and think, “Wow, that little window on that BIG wall?” Or, “That _______ looks really out of place with the style of the rest of the house.”
I still really think a couple dormers would look good with the house. The problems we ran into pertain more to the pitch of the new roof than to the dormers themselves. As we ‘mocked up’ our dormer project, we found that in order to make the “face” of the dormers as big as I wanted them, pretty much everything else would have to look really bad. One of my trusty volunteers described the effect you see sometimes where the dormers jut out so far that there ends up being mini-hallways protruding from the roofline. Not only that, but then I’d have to buy windows to go in the dormers, and that decision was not one I wanted to make in a hurry. The whole thing could have been smoother had I bought the steeper 7-pitch trusses vs. the 6-pitch that I bought. Price difference: $200 per truss x 21 trusses. No thanks.
Long story short: shingles went on the garage without dormers. I can always add them later, though it will take a little more effort.
Which brings me to the issue of the shingles. I’m happy with the actual shingle I picked – it’s a good mix of black, grey, brown, and blue (if that makes sense) so it will hopefully go with anything. It’s the work that I am not happy with.. in retrospect.
Initially, I was in what you could call a honeymoon period with my new roof. I was just so dang happy to have it! Once the rose-colored glasses came off, I started adding things up. Not only was the end cost noticeably higher than the bid (with extra charges for nails and other materials that one might assume would be included), but the yard was a mess as was the house itself. Then, to top it all off, I have to pay for the dumpster they filled with the scraps. Again, you might assume this would have been included..
This is another reason I feel like absolute crap for hiring people I don’t know from out of town – there’s no accountability.. I traded that for a big, fancy crew that could slap a roof on in a short amount of time for less money than a local. Both of which turned out to be untrue. I’m disgusted with them, and with myself for going against my gut instinct.

As for new updates, I had soffit and fascia delivered the other day. That will finally close the gap between the top of the walls and the edge of the roof. I’ve decided on a siding material – I’m going to spring for the slightly more expensive cement board in exchange for spreading the siding project out over this year and next. That way I’ll get the new construction and a good portion of the back of the house covered in new siding, and I’ll take care of the front half – which is more labor-intensive – next year when I have the money to do so.
Oh, joy!

Friday, September 9, 2011

Shingles, garage doors, and other cool stuff

Since the last installment, we’ve made some pretty noticeable progress, I’d say!
First, the roofers are nearly done! In fact, they should be finishing as I write this..
Before..

That process proved to take a bit longer than anticipated – not only were there several layers to tear off the steep roof in the front of the house, but one of the crew members had a family emergency and the entire crew was unable to work for a couple days. I can’t complain about that..because I have a soul. Luckily for us, the weather has been absolutely terrific and I’m not the slightest bit worried. My mother, on the other hand, seems to think that I will be the coziest little bat hotel in the tri-county area. I had no idea how deathly afraid of bats the women around me are until we started this project, but we’re working through it.
Working away..
Nearly done!
Snazzy recycled garage door.
With the roof nearly complete – and a snazzy new/recycled-from-the-old-garage-garage door in place – our work on the house will really fly from here. We can use the garage space to its fullest potential now – storage, workshop, shelter, etc. My dad is already planning for the workshop he’s putting together out there. The joke is that once the house is finished, I won’t actually be able to park in my own garage because he’ll have it so filled with table saws and planers that I’ll end up in the street. We all make sacrifices. J


Inside the house, we’re building walls! Not only are we stiffening and restructuring some of the existing walls, we’re also tweaking things slightly, making spaces more workable, and improving the wiring, plumbing, and insulation along the way. It shouldn’t be too long before there’s new drywall hanging back here – who knows..maybe one day I’ll get to live here?
Removing the old windows between the laundry and the garage.
...and installing a door!
First batch of carpet coming up. Stay tuned for more!